
Lawn Sense’s Complete Guide to Replacing Any Sprinkler Head
If you’re serious about your lawn then you probably use your sprinkler system often. There are many benefits to watering your lawn regularly but like anything else, there will be problems. We’re going to teach you about one of the most common sprinkler repairs you’ll have to make on your sprinkler system. How to replace any sprinkler head on your system with a new head.
If you plan to replace the broken head with the exact same model check out our tips on how to replace a sprinkler head without digging. This is the recommended option as it’s much easier. If the exact model you have isn’t available or you want to upgrade heads follow these steps on how to change any sprinkler head with a new one.
Materials Needed:
- New Head
- Nozzle (Unbroken nozzles can be reused)
- Shovel
- Channel lock pliers (Not required)
Find the right replacements
The first thing you’ll have to do when replacing any sprinkler head is figure out what new head and nozzle you’ll be replacing the broken head with. If by chance the old nozzle is intact you can clean the filter and reuse the nozzle. If not, you’ll need a new one as well. Read this article if you aren’t sure which nozzle to use.
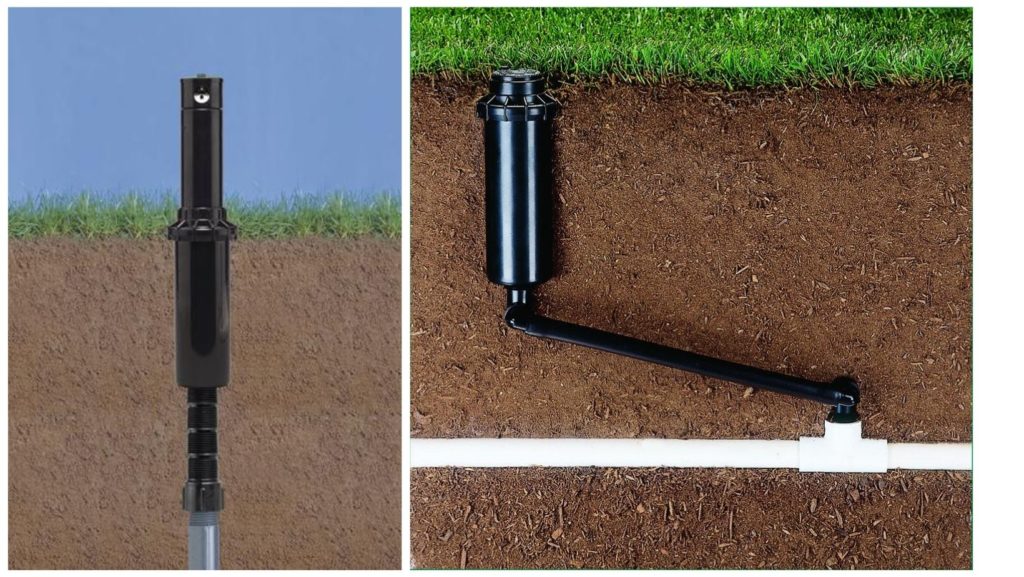
Figure out how the heads are connected
Heads are connected to the water line a couple of different ways. One way is through what are called risers. Risers are green or black threaded tubes that are cut to length and screwed to a threaded T fitting on the zone line. This type of riser have very little flex and are installed straight up from the pipe. You can cut to length with pipe cutters or a pocket knife.
The other type of fitting is called a swing joint. It consists of two or three threaded pieces attached to flexible hose. Which allows much more flex to the head and allows for easy placement. This is the preferred way to connect heads but are more costly than the green/black risers.
Remove old head
The next step to replacing any sprinkler head is to remove the old head and make sure the connection is still good. To accomplish this use your shovel to dig the dirt out about 2 inches below the base of the sprinkler head. Try to slope the dirt away so when you unscrew the head dirt doesn’t fall into the pipes. If this does happen don’t worry, we’ll take care of this later. Now that the dirt is removed and sloped you can unscrew the sprinkler head. If you can’t do it by hand use the channel lock pliers and slowly apply pressure until it breaks loose. Be careful not to break the riser if it’s not a swing joint, they can be fragile.
Install new sprinkler head
Assuming the riser or swing joint is intact you are ready to replace your sprinkler head. If not, you can check out these tips on changing out the riser.
This part is as simple as it seems. remove the nozzle from the new head if you haven’t already and carefully screw on the new head hand tight. Many other posts will tell you to add teflon or seal tape to the threads when installing heads, this is wrong. Don’t use this type of tape when screwing plastic to plastic. I know many people who aren’t licensed irrigators will disagree with this but it comes straight from the Texas Irrigation textbook.
Now that the head is screwed on you’re probably wondering why the nozzle is off, we’re about to show you.
Flush system
This is an important step to replacing sprinkler heads that is often forgotten about. Unless you are absolutely sure no dirt got in the pipes we recommend doing this. It only takes a couple of seconds to do and it will save you from having to take the head back off later. With the nozzle removed turn on the zone that controls the head you are replacing. Immediately turn the water back off once you see water shoot up. Now that area is flushed. If you are replacing multiple heads at once you may need to repeat this step with other heads.
Install and adjust nozzle
We’re almost done! Now all that is left is to install the nozzle and adjust the coverage radius. If you need help adjusting nozzles you can read more about that here. The key this is to make sure you only water the lawn or plants. Don’t allow overspray onto the sidewalks by more than 3 inches. Also, make sure you aren’t watering your fence or house.
Final tips
Once the nozzle is installed and the coverage is adjusted you’re pretty much done replacing your sprinkler head. One thing to check is that the head is level with the ground after you fill the dirt back in. If you find that the head is sticking up too high or down too low the head will need to be adjusted. Check out how to adjust sprinkler head height here.
If you need help in the Dallas metroplex Lawn Sense can help!
Call us today (972) 348-0475 so we can get you on the schedule ASAP! If we don’t answer or call back in one hour lunch is on us!